Windows x64
This guide provides instructions for setting up the development environment and using ItalaApi on Microsoft Windows machines. When installing ItalaSDK on Windows x64, several components are provided to support camera integration and development.
ItalaView is a desktop application designed to demonstrate and test camera features interactively.
ItalaApi, which offers programming interfaces for C++, C, Python, .NET, and .NET Framework, enabling developers to integrate camera functionality into a wide range of applications.
Itala GigEVision Filter Driver is included to enhance network packet management and improve data transfer reliability.
ItalaGenTL producer as a .cti file, allowing third-party software to interface with Itala cameras using the GenTL standard.
ITALA_DEV environment variable
The ItalaSDK installer creates an environment variable called ITALA_DEV which points to the Development directory of the installation. If your development tools allow it, you can use this variable for easier path configuration.
DLL management
The installer automatically adds the directories containing the binary files (DLLs) of ItalaApi and GenICam to the system PATH, for both Release and Debug versions, allowing for out-of-the-box use.
Warning
If you prevented the installer from adding the DLLs to the system PATH during installation, you must manually copy the necessary DLLs into the same folder as your project’s executable.
Configuration by language
The following sections outline the necessary steps for the different supported programming languages.
To use ItalaApi and GenApi, you must configure your development environment as follows:
Include Path: Must point to the
Development\includefolder.Linker Path: Must get the
.libfiles from theDevelopment\libfolder.
Note
GenICam and GenApi libraries are linked automatically thanks to a set of macros included in the header files of the libraries themselves. There is no need to explicitly indicate the .lib files to the linker, only the folder is needed.
To make the APIs available in your code, include the following files:
#include <ItalaApi/Itala.h>
#include <GenICam.h>
The current release targets Microsoft Windows machines with MSVC v140 compiler or higher (Visual Studio 2015-2022). The CodeSamples solution provided with the SDK shows an example of project configuration.
Example with Visual Studio 2022 (64-bit, Release)
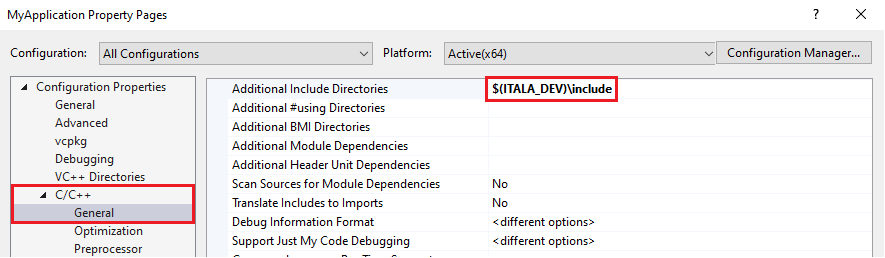
Additional Include Directories: In the project properties, go to C/C++ -> General and add the path to the include folder.
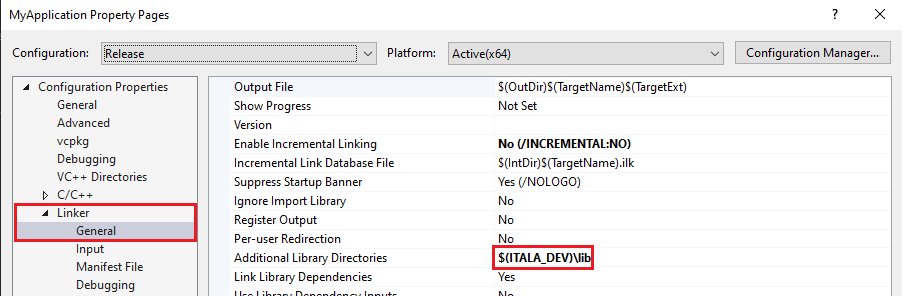
Additional Library Directories: Go to Linker -> General and add the path to the library folder.
Additional Dependencies: Go to Linker -> Input and add
ItalaApi.libto the list of dependencies.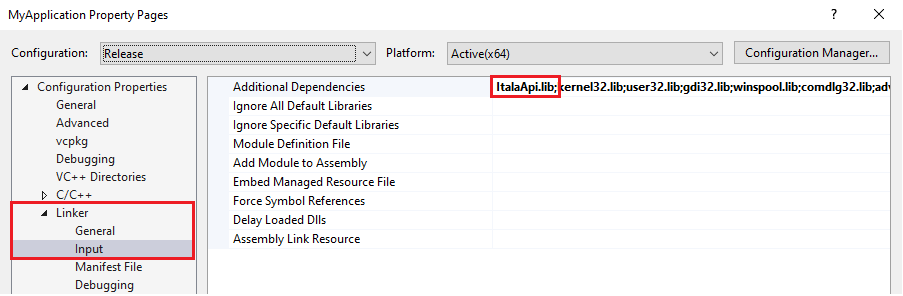
To use ItalaApiC, the development environment must be configured as follows:
Include Path: Must point to the
Development\includefolder.Linker Path: Must get the
.libfiles from theDevelopment\libfolder.
To make the API available in your code, include the following file:
#include "ItalaApiC/ItalaC.h"
The current release targets Microsoft Windows machines with MSVC v140 compiler or higher (Visual Studio 2015-2022). The CodeSamples solution provided with the SDK shows an example of project configuration.
To use ItalaApiNET, you need to add a reference to the ItalaApiNET.dll library, which is located in the Development\bin folder.
The current release targets .NET 6 or higher.
To make the API available in your code, use the Itala namespace:
using Itala;
Example with Visual Studio 2022
You can easily integrate the library into a Visual Studio project.
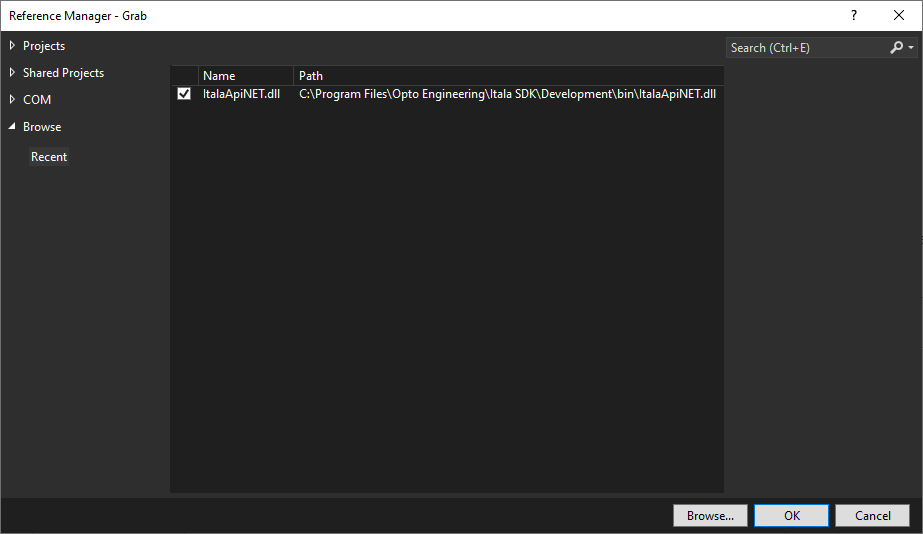
Go to Project -> Add Project Reference….
From the Browse tab, select the
ItalaApiNET.dllfile from the SDK installation path.
Important
ItalaApiNETFramework has been built with .NET Framework 4.8.
To use it, you need to add a reference to the ItalaApiNETFramework.dll library, which is located in the Development\bin folder.
To make the API available in your code, use the Itala namespace:
using Itala;
Example with Visual Studio 2022
You can easily integrate the library into a Visual Studio project.
Go to Project -> Add Project Reference….
From the Browse tab, select the
ItalaApiNETFramework.dllfile from the SDK installation path.
To use ItalaApiPython, you must install the wheel package using pip. The wheel file is located in the Development\bindings subdirectory.
Run the following command from the bindings directory:
...Development\bindings> python -m pip install itala-1.0.0-....whl
To make the API available in your code, import the itala module from the itala package:
from itala import itala
Hardware configuration
For hardware or network configuration instructions, please refer to the camera’s manual.